
6.0 KiB
ReSpeaker Microphone Array Topics
In this tutorial we will see the topics more in detail and have an idea of what the ReSpeaker can do. If you just landed here, it might be a good idea to first review the previous tutorial which covered the basics of the ReSpeaker and the information about the package used
ReSpeaker Topics
Begin by running the sample_respeaker.launch.py file in a terminal.
ros2 launch respeaker_ros respeaker.launch.py
This will bring up the necessary nodes that will allow the ReSpeaker to implement a voice and sound interface with the robot. To see the topics that are available for us you can run the command ros2 topic list -t and search the topics that we are looking for.
Don't worry these are the executables you can run to see the ReSpeaker results.
ros2 topic echo /sound_direction    # Result of Direction (in Radians) of Audio
ros2 topic echo /sound_localization # Result of Direction as Pose (Quaternion values)
ros2 topic echo /is_speeching       # Result of Voice Activity Detector
ros2 topic echo /audio              # Raw audio data
ros2 topic echo /speech_audio       # Raw audio data when there is speech
ros2 topic echo /speech_to_text     # Voice recognition
ros2 topic pub  /status_led ...     # Modify LED color
Let's go one by one and see what we can expect of each topic, the first is the sound_direction topic, in the terminal execute the command that you learned earlier:
ros2 topic echo /sound_direction # Result of Direction (in Radians) of Audio
This will give you the direction of the sound detected by the ReSpeaker in radians
data: 21
---
data: 138
---
data: -114
---
data: -65
---
The Direction of Arrival (DOA) for the ReSpeaker goes from -180 to 180, to know more about how is it in Stretch watch this DOA diagram:

The next topic is the sound_localization, this is similar to the sound_direction topic but now the result it's as pose (Quaternion Values), try it out, execute the command:
ros2 topic echo /sound_localization # Result of Direction as Pose (Quaternion values)
With this you will have in your terminal this:
---
header:
  stamp:
    sec: 1695325677
    nanosec: 882383094
  frame_id: respeaker_base
pose:
  position:
    x: -0.0
    y: 0.0
    z: 0.0
  orientation:
    x: 0.0
    y: 0.0
    z: 0.43051109680829525
    w: 0.9025852843498605
---
The next one on the list is the is_speeching topic, with this you will have the result of Voice Activity Detector, let's try it out:
ros2 topic echo /is_speeching # Result of Voice Activity Detector
The result will be a true or false in the data but it can detect sounds as true so be careful with this
data: false
---
data: true
---
data: false
---
The audio topic is goint to output all the Raw audio data, if you want to see what this does execute the command:
ros2 topic echo /audio # Raw audio data
You will expect a lot of data from this, you will see this output:
---
data:
- 229
- 0
- 135
- 0
- 225
- 0
- 149
- 0
- 94
- 0
- 15
For the speech_audio topic you can expect the same result as the audio topic but this time you are going to have the raw data when there is a speech, execute the next command and speak near the microphone array:
ros2 topic echo /speech_audio # Raw audio data when there is speech
So if it's almost the same topic but now is going to ouput the data when you are talking then you guessed right, the result will look like the same as before.
---
data:
- 17
- 254
- 70
- 254
Passing to the speech_to_text topic, with this you can say a small sentence and it will output what you said. In the terminal, execute the next command and speak near the microphone array again:
ros2 topic echo /speech_to_text # Voice recognition
In this instance, "hello robot" was said. The following will be displayed in your terminal:
transcript:
  - hello robot
confidence:
- ######
---
And for the final topic, the status_led, with this you can setup custom LED patterns and effects. There are 3 ways to do it, the first one is using rqt_publisher, in the terminal input:
ros2 run rqt_publisher rqt_publisher
With this the rqt_publisher window will open, there you need to add the topic manually, search for the /status_led topic, then click in the plus button, this is the add new publisher button and the topic will be added, then you can start moving the RGBA values between 0 to 1 and that's it, you can try it with the next example:
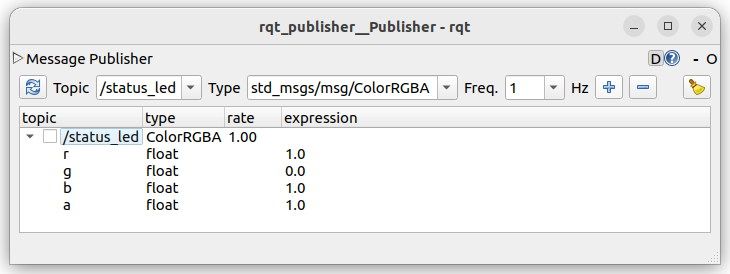
You will see that there's a purple light coming out from the ReSpeaker, you can change the rate and color if you want.
Now for the next way you can do it in the terminal, let's try again with the same values that we had so input this command in the terminal:
ros2 topic pub /status_led std_msgs/msg/ColorRGBA "r: 1.0
g: 0.0
b: 1.0
a: 1.0"
And you can see that we have the same result as earlier, good job!
And for the final way it's going to be with a python code, here you can modify the lights just as we did before but now you have color patterns that you can create, let's try it so that you can see yourself, input in the terminal:
cd ament_ws/src/stretch_tutorials/stretch_ros_tutorials/
python3 led_color_change.py
With this we can change the colors as well but the difference is that we are able to create our own patterns, in the ReSpeaker Documentation there are more options to customize and control de LEDs.